Access Control
Overview
Access Control defines authorization in AI Studio. Authorization means knowing what action the user can perform on a resource. Access can only be granted by the Tenant Administrator and owner of the project (the user who creates the project). All other roles; Developer, Tenant User and Analytics User, are considered while defining resource access.
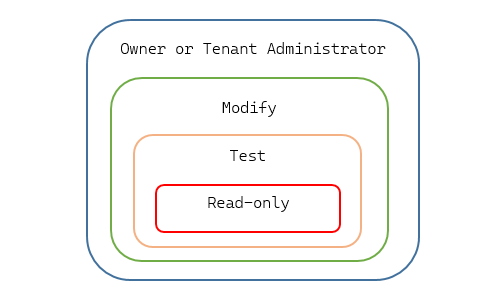
We have three access levels, detailed explaination below,
- Read: It provides view only access to the resources. The user can only view project details but can’t test/modify anything. Also, sensitive data (like passwords) would not be accessible.
- Test: It provides test access to the resource. In context of projects types, along with read access to the project,
- Cognibot project, Test Dialogs is accessible.
- NLU and KM projects, Prediction tab is accessible.
- Modify: It provides full access to the resource. Users can perfom all project-related operations (except delete project) with this access.
If Cognibot project is utilizing NLU and/or KM projects, Tenant Administrator has to explicitly grant access to those projects to the respective users. The exception to this is only if the logged in user is the owner of these projects or Tenant Administrator.
The screenshot given below shows access precedence
Resource access can be granted to a single User or Group of users. Access can be defined w.r.t. resource, user or group; the same are depicted in form of three subtabs.
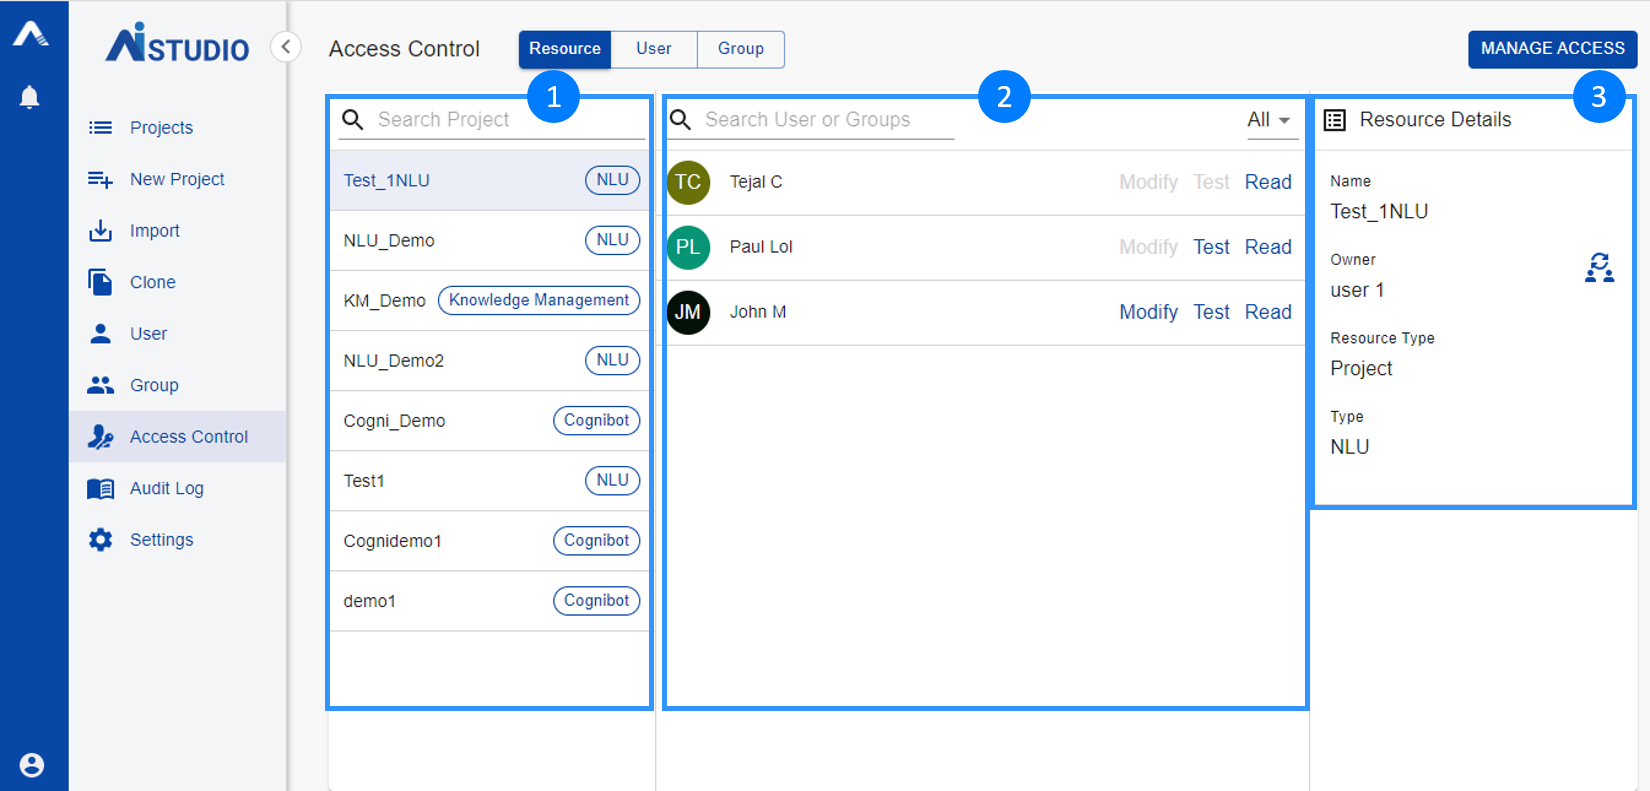
- Shows a list of items for which the access level needs to be defined. An option to search existing entries also is provided here.
Depending on the subtab selected details shown are,- Resource: List of projects for which access is defined for the logged in user. In case of Tenant Administrator, all projects will be shown.
- Users: List of Users (except Tenant Administrators).
- Groups: List of Groups.
- Shows the access level defined for the selected item in the previous section. Along with the option to search existing entries, the values can be filtered based on the access level.
Depending on the subtab selected details shown are,- Resource: List of Users and/or Groups along with the access level for the selected project.
- Users: List of Projects along with the access level for the selected user.
- Groups: List of Projects along with the access level for the selected group.
- Shows details of the selected item in first section.
Depending on the subtab selected details shown are,- Resource:
- Name: The Project Name selected.
- Owner: The user who created the project.
Ownership TransferDetails explained here.
- Resource Type: The resource type of the selected item.
noteCurrently we only support access level control for Project.
- Type: The project type of the selected item.
- Users:
- Name: The full name of the selected user.
- Role: The role assigned to the selected user.
- Group: The group names which the selected user is part of.
If the user is part of more than 10 groups, a pop-up icon ( ) is shown. On clicking this icon, a View Groups dialog is opened. This dialog lists all the groups the user is part of along with a search option.
 - Owner: List of Projects the selected user has created (owner). Search option is also available here.
- Groups:
- Name: The group name selected.
- Members: The number of users in the selected group.
- Users: List of Users that are part of the selected group.
If the members are more than 10, a pop-up icon () is shown. On clicking this icon, a View Users dialog is opened. This dialog lists all the users in the group along with a search option.
- Resource:
It is possible that a user is granted access to a specific project individually as well as inherited from a group. In case where the same user is granted permissions from various ways, the access with the least restrictions will be granted to the user.
For example, User 1 belongs to Group 1. User 1 has Read access to Project 1 and Group 1 is granted Modify access. In terms of precedence, User 1 is given access to Modify.
Manage Access
Manage Access dialog can be used to modify the resource access. This option is available for each subtab.
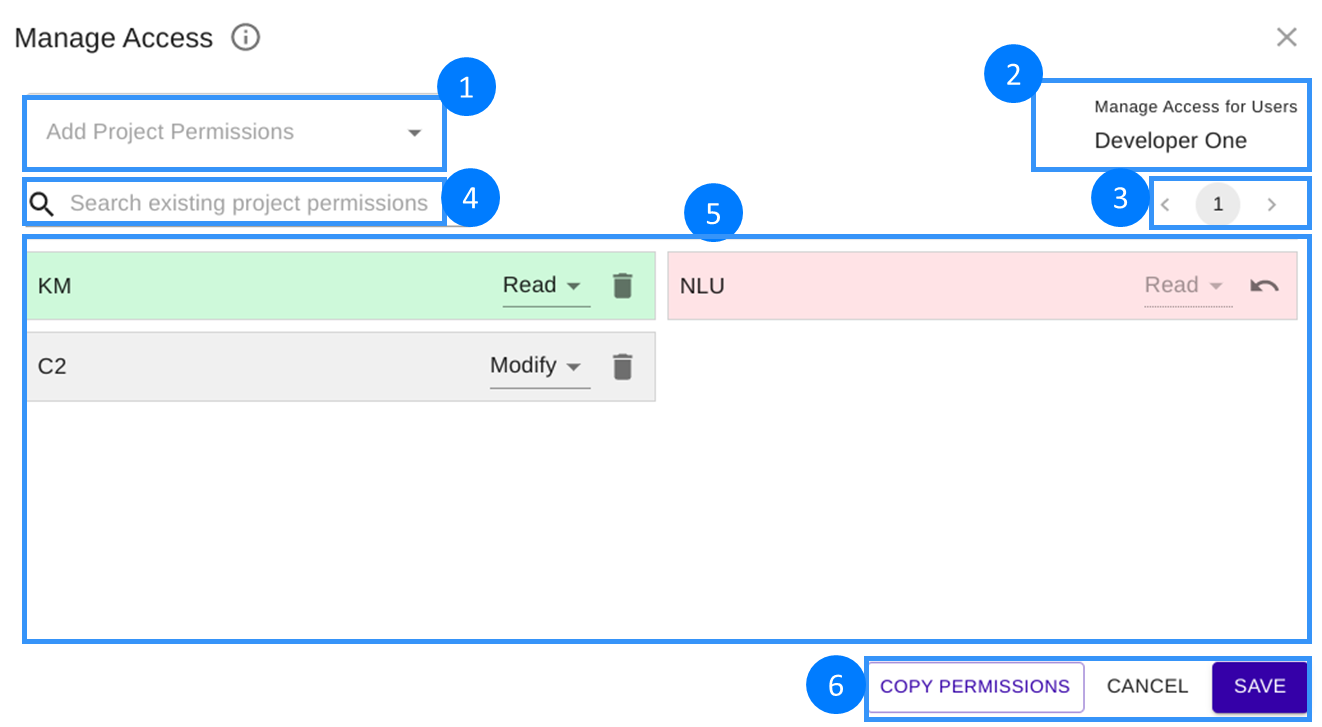
- Search and add for whom the access is to be granted. Depending on the subtab selected details shown are,
- Resources: Add Users or Groups.
- Users/Groups: Add Projects.
The default access level on add is Read. You can select the access level to be granted explicitly.
- Name of resource for which the access is being managed. Depending on the subtab selected details shown are,
- Resources: Shows the Project Name.
- Users: Shows the User Name.
- Groups: Shows the Group Name.
- Page navigation: If the number of entries is large, the list is divided into 10 entries per page.
- Search exisiting project permissions: Search box for existing entries. This search spans over all the pages and filter the results based on the name typed in.
- List of whom the access is granted along with the access levels. Depending on the subtab selected details shown are,
- Resources: List of Users/Groups.
- Users/Groups: List of Projects.
You can delete an entries by clicking the Delete icon ( ) on the specific entry. To undo the deletion, click on Undo icon (
 ).
).
- Save: Save all changes.
Cancel: Cancel the changes and close the dialog.
Copy Permissions: Copy all permissions from an exisiting User or Group. Detailed explanation below.
Copy Permissions
Copy Permission option is available in Manage Access for Users and Groups. This feature is useful when you have many permissions already assigned to a User or Group, which can be copied and then modified as needed.
- Once the project permissions are added using Copy Permission option to the user, any modification to the user(s) or group(s) project permission (the user is part of) will not be considered.
- Even if the user is removed from any group from where the project permission was copied, none of the copied permissions are automaticaly modified.
- If the project is deleted, all related permissions from Resources, Users and Groups are deleted. Similarly if a user or group is deleted, all related project permissions for these will be deleted.
Following subtabs have access to Copy Permission option, each is described below,
- Users
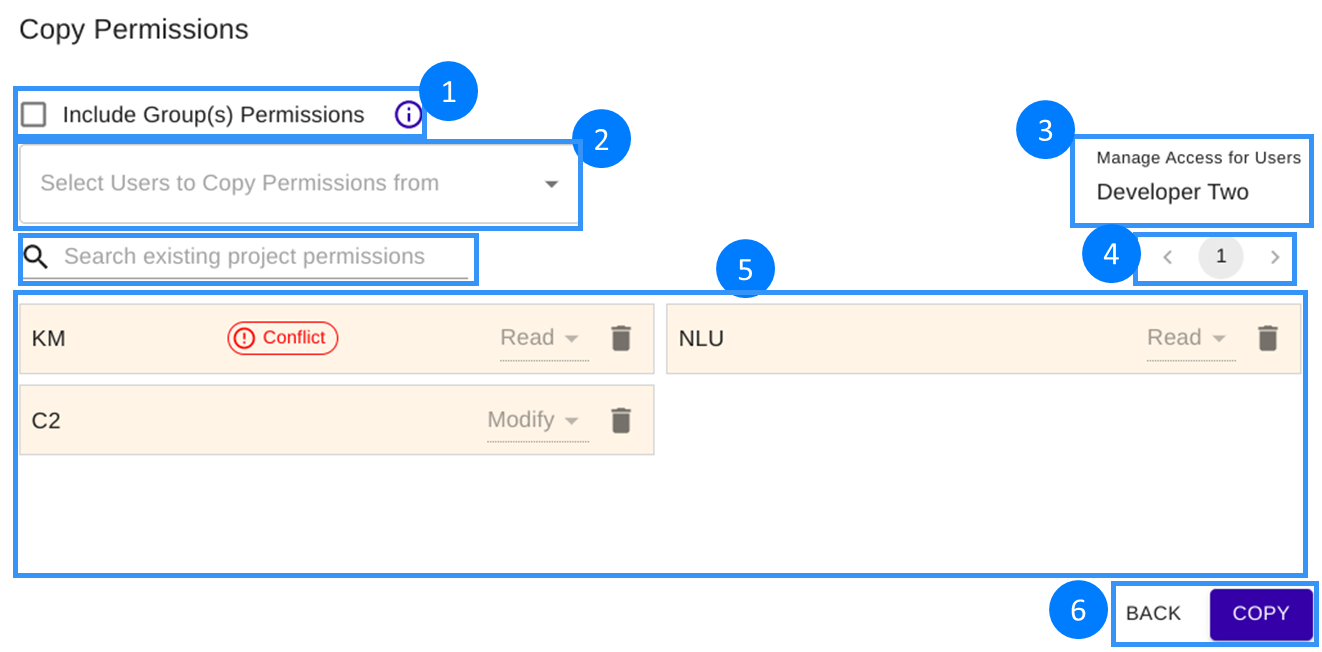
- Include Group(s) Permissions: If this option is selected, all the project permissions inherited through Groups which the user is part of is also included. Else, only the permissions which are directly granted to the user will be copied.
- Select Users to Copy Permissions from: Search and add the User from which the permissions is to be copied.
- Manage Access for Users: Shows the User Name for which the access is being granted.
- Page navigation: If the number of projects is large, the list is divided into 10 entries per page.
- Search existing project permissions: Search box for existing projects. This search spans over all the pages and filter the results based on the project name typed in.
- List of Projects with access level.
You can delete the project permission by clicking the Delete icon () on the specific project.
If there are any project permissions that are already granted to the user, it shows a Conflict. Also, such project permissions will not be copied. - Copy: Copies all the permissions in the above list to the user. Back: Cancels all modifications done on Copy Permissions dialog and goes back to Manage Access dialog.
- Groups
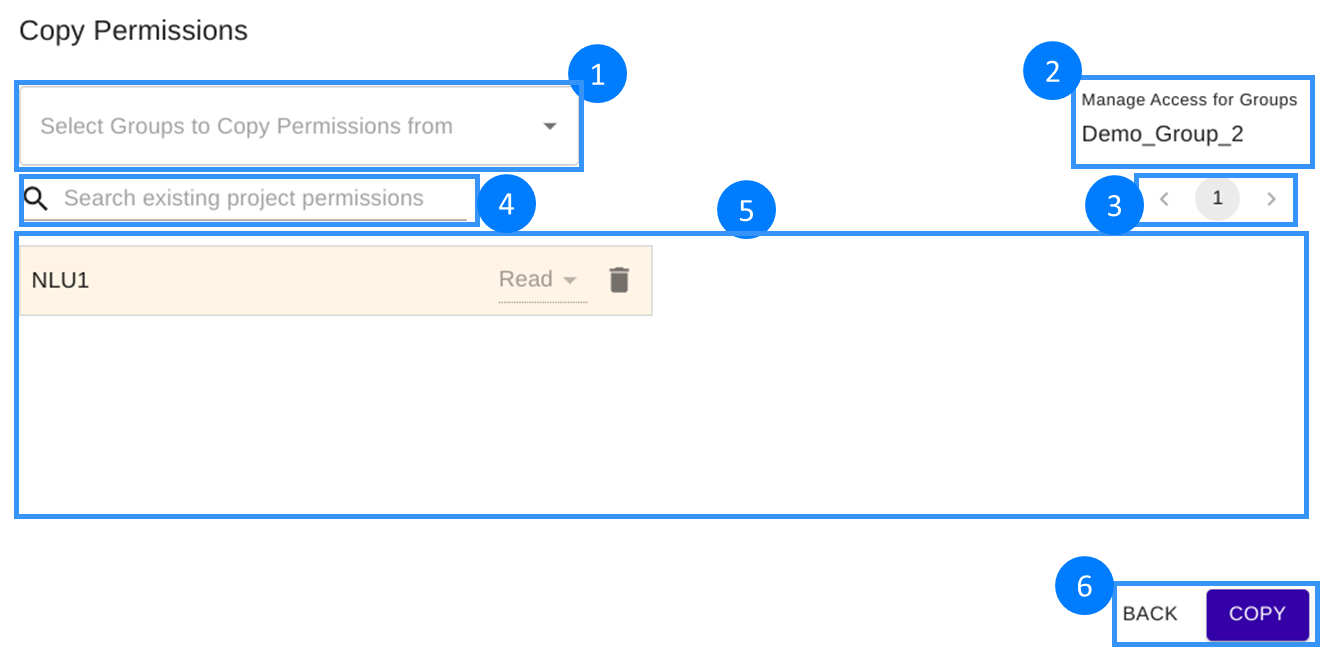
- Select Groups to Copy Permissions from: Search and add the Group from which the permissions is to be copied.
- Manage Access for Groups: Shows the Group Name for which the access is being granted.
- Page navigation: If the number of projects is large, the list is divided into 10 entries per page.
- Search existing project permissions: Search box for existing projects. This search spans over all the pages and filter the results based on the project name typed in.
- List of Projects with access level.
You can delete the project permission by clicking the Delete icon () on the specific project.
If there are any project permissions that are already granted to the group, it shows a Conflict. Also, such project permissions will not be copied. - Copy: Copies all the permissions in the above list to the group.
Back: Cancels all modifications done on Copy Permissions dialog and goes back to Manage Access dialog.
Ownership Transfer
We have provision to transfer the ownership of a Project from one user to another. Only the Tenant Administrator can perform this operation. The steps to transfer project owner is explained below,
- Click Resources subtab.
- Select the project whose owner is to be changed.
- Under Resource Details -> Owner, click on (
 ).
). - Search and select a new user from the list.
- On user selection, a confirmation dialog is shown.
- The Tenant Administrator has to enter a reason for this transfer.
- Click Yes to confirm the new owner.
In case of user deletion, all the projects owned by this user is automatically transferred to the Tenant Administrator who is deleting this user.